Thursday 10 December 2009

How I Iearnt how to use a dope sheet


This is how I learnt how to use a dope sheet

Storyboad RVJ page 4


storyboard RVJ page 3


new storyboard page 2


RVJ - Page 25


My new stoyboard

RVJ - Page 24


I have be looking at the simpsons sketchbook and storyboard and theyattach a lot of importance to character's characteristics. I don't know if that helps but I would like to give it a try, maybeit will be useful later in the animation.


My femle character: Her characteristics


  1. She loves playing with her earrings wheever se is nervous.

  2. Her right eye twitche a lot when she is nervous ( I intend to use this in my animation, wheneve she is nervous)

My male character: His characteritics


  1. Whenever he gets angry, his moustache tends to become sharp and straight

  2. Or when he is extremely mad his eyes grow bigger with veins coming out

  3. He can't control his eyebrows, they twitch on their own

Videotest me tapping pencil on a table

RVJ - Page 23


Here is my male character design and some of its characteristics.

My new characters


After reflecting over my human characters a lot I thought maybe it would be smarter to use the animal characters I was thinking about, so here is my female character.

Me lip synching I can't do that

Tuesday 8 December 2009

RVJ - Page 21 Storyboard Page 2


This is page 2 of the first animation I was supposed to make for the audio.

Storyboard RVJ Page 20


Here is the storyboard for the first animation I was gonna use for the audio.


  • This is the first page of my storyboard, what happens is that first we have a far view of the place where the main action is going to take place (In this case it's the building at the far end with the letters NEWS on it).

  • I will be applying different shots just to give the right informations to the viewers to show them what they shouldn't miss to understand the story

RVJ - Page 19


This is the background for the first scene of my animation.


  • I'm going to divide this background into different layers that will be animated seperately, it will be a bit like in the anime called DA CAPO S.S (http://www.youtube.com/watch?v=LmO9RG_wXa4&feature=related from 1.12 to 1.14 you can see that the tree that is the foreground is moving at a different speed than the background, there was another video like that but with building only I can't remember the link).

  • We were told about different shots being used in the film and animation industry.

  • Close up, medium, long and extreme sclose up shots. I have been reflecting over this and I think they are used to transmit different informations to the viewers (Maybe informations on what is going on in the scene, something the viewer needs to pick on in order to understand the scene or animation or even movie).

  • For example one day I was looking at Tomb Raider Underworld cutout scenes ans there is this scene where she is conversing with someone over the phone, at first we see close up and medium shots then there is a moment where you can see a close up shot that includes the main character and if you look very closely and very carefully you will notice someone running at high speed behind her (That's supposed to be her enemy in the movie, so if I got it right they are trying to make us understand something, us as in us players or viewers) Here is the link http://www.youtube.com/watch?v=KdNwdGZ1Aks&feature=related from 0.14 to 0.16

RVJ - 18


  • I made a real life video for this animated background. I just wanted to see how it looks when a camera is moving along an object situated in front of a background and standing as the foreground itself, if you look very closely you will realize that the foreground moves slightly ahead of the background and in two different directions.

  • For instance if the background moves to the left it will move more slowly than the foreground and the foreground itself will move the opposite direction, meaning- it will move to the right (And vice versa).

  • This is the character I made for my first lip synch test you can see the video at the bottom of the blog (Not the far bottom but somewhere in the middle =) )

RVJ - Page 17


Character design-TRial 1


  • Well I can't seem to be able to stretch their faces much, I think I will simply replace them with animal faces (Maybe normal animals looking a bit like human in their behaviours and a bit physically)

  • I think I don't want the female actress to look too young like in my first attempt at drawing a female animal character, so I'm just gonna draw her with an older uglier look. (Maybe with wider eyes and a wider more expressive mouth)

  • And so here is the result, I love it...Now I need to design a male character.

RVJ - Page 16


Background ideas, On this page of my RVJ I talk about how I would like my backgrounds to look and I would like to animate them. (Which effects I would like to apply and the directions of the moving objects, they are just rough ideas inspired from one of the animations I saw during the flip festib=val, I can't remember which one exactly).

RVJ - Page 15

From the start I could already see that the characters were going to be hard to exaggerate. But still I will keep on working on them and if I'm still not satisfied I will try different characters, maybe animals with more expressive faces.


I think these characters are not suitable for this animation because the ausio contains angry and surprised reactions, and the reactions require some strong exaggeration for the expressions to look real enough, after all animation doesn't seem real if not exaggerated.

RVJ - Page 14


Before I make my storyboard I need to choose an audio, then I need to create the characters, need to talk about their physical characteristics like for the simpsons characters (Check their storyboard) and also their personalities Then I can think about the storyboard.


The audio I'm gonna use is: Have you written it ?


  • Have you writen it

  • I...I can

  • Have you writen it ?

  • An outline

  • OK but it's just an outline, right ?

  • Yeah Sort of

  • Sort of

  • Yeah it's just not tight

  • Not tight ?

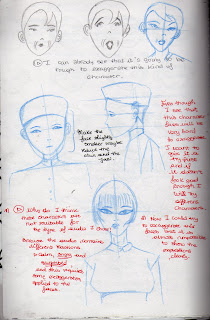
I will create the characters then apply different expressions to them based on each sentence they use in the dialogue.


Before I use them as my final characters I will try to exaggerate their expressions just to see if it's suitable for the dialogue.


Monday 7 December 2009

RVJ - Page 13


This is just a fast lip synch trial I did on lash just for the sake of it, that was personal test to check if I really understood how to use a dope sheet and if I understood how to get the lip synch right.

Lip synch First try - I can't do that audio

RVJ - Page 12


Dope sheet for I can't do that. I think I got it right.

RVJ - Page 8


Just a picture of how I divided the audio into different parts using audacity, in order to see each frame properly.
This is for the beginning of the audio "I"
Pages 9,10 and 11 of my RVJ are the same as this one but it's for the rest of the audio.

RVJ - Page 7


I wanted to do some test on lip synch before working on the actual audio, so I recorded my own voice saying "I can't do that". Because I have never used a dope sheet before, I would like to understand how to draw frames according to the audio first before I use the actual dope sheet. So here is a rough dope sheet that I made myself, where I write the words, how long it takes and how many frames it uses. And after that I will try to match it with the dope sheet.

RVJ - Page 6


These are just some notes that I took when Kelvin was talking about how to make a storyboard.


A storyboard is not a comic strip, as animators we should always use proper storyboards templates. Title stands for " The title of the project", SC stands for the different scenes, it should always be numbered, the timing stands for " How long does a specific scene lasts "


Action} What the character does, for instance = If he walks left to right or bends down to pick up something (Should be indicated by arrows tip pointing at the direction of the movement.)


Bg} stands for background, it's useful to number it so that you don't have to draw it on your storyboard in each scene that needs the same background, just write the number for that specific background.


Trans} stands for transitions- like dissolve or fade in between scenes.


I could draw little thumbnails to get an idea on what an action might look like.

RVJ - Page 5


This is the final storyboard I have looked at.


  1. Arrows to indicate the character's movements

  2. different shots, close up, long shot, medium shot...

  3. A bit of explanation.

So if I resume everything here are the common points they share:


The arrows are used to indicate the direction of a movement and you have different shots and finally some explanation on what is happening in each scene. I will try to include all that in my own storyboard, to give the maximum of informations to the viewers.

RVJ - Page 4


  1. Here arrows are used to indicate the character's movements (The direction of the movement) and to indicate the direction of the video camera' view.

  2. There is a bit of explanation on what is going on in ecah scene.

  3. No indication of any transitions or special effects like zoom in or pan.

RVJ - Page 3


This is anothers storyboard again, this time arrows are used to indicate the direction of the movements just like in the simpsons' storyboard, that's apoint in common.


And there is a bit of explanation about what's going on in each scene just like in a doggy day storyboard, another point in common.

RVJ - Page 2


Here is another storyboard based on an animation called "A doggy day"

This time around you can see that there is some explanation on what will happen in each scene unlike in the simpsons storyboard where you only have drawings.


  1. No arrows to indicate any action or movement.

  2. No special effects or transitions mentionned.

RVJ - Page 1


I will be looking at different animation' storyboards like the simpsons or some others, just to see how they explain the actions that will take place in the animation, the special effects like panning or zooming in and also transitions between each scene (If there is any). Then I will write down all the points they have in common and their differences. This will give me a general idea on what a proper storyboard must look like.

  1. Arrows showing the characters actions (Scene 1)
  2. Zoom in focus on two characters (Scene 4 and 15)

My final lip synch animation

Drinkingcoffee test

First aimatin Tapping fingers

Saturday 31 October 2009

20 s animation ideas


Morphing animation

Final Keyframes


With coulours

My character with some colour on it.

Just simple colours because this is the 1st time I make such animations.

Tips learnt from my previous projects

  • What I have realized today is that I when I draw and animate something, it tends to grow bigger everytime.
  • After drawing the keyframes for this project and filling in the gap between them realized that the animation keeps its original size.
  • So now each time I make an animation I have decided to dawthe keyframes to keep the same size.
  • Sometimes it doesn't only grow bigger, it moves sideway as well.

Storyboard

Here is my storyboard with some rough keyframes

Different exaggerated expressions

Now that we have a character, let's try to apply some different expressions to it. For instance Neutral, smiling, surprised, sad or even a puppy face

And let's try to exaggerate these expressions to the maximum.

After fnding exaggerated images I'm going to make a storyboard

My final morphing project


The first morphing project did not look like it was exaggerated, It was hard to stretch the character's face, so I have decided to create a character of my own (A character more suitable for the stretching and squashing that is required in this project. At first I was going to create a human face or an animal, then combined both and it gave me this character.

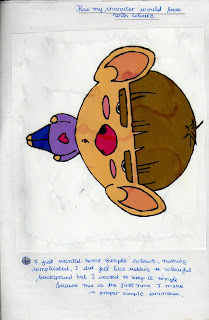
I think this character is OK (Maybe I should raw him with some pointed ears just to make it look more like an animal rather than a human).

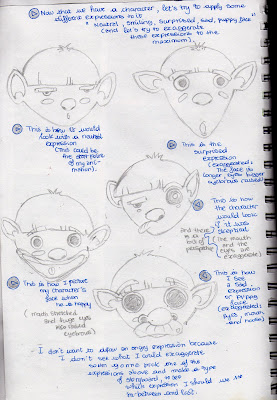
I will now try to apply some expressions to it on my RVJ before I animate it, then based on that I will create a storyboard which will include the key frames and what must appear in between.

Friday 30 October 2009

Exaggeration Test 1

As you can there is no exaggeration at all because I do not know how I can possibly exaggerate such face...So I think I might create another character more suitable for this project and I will apply the same expressions I tried to apply on the first character.

Expressions for the exaggeration project

I took pictures of myself wearing different expressions just to help me get ideas on how each expression might look on my character.


The exaggeration animation Task Part 3

A rough a sketch of how my character would look if animated it with an angry expression (From a neutral expression an angry one)

The exaggeration animation Task Part 2


Here are some facial expressions of real human beings and here is how I would actually animate my character, which expressions I'm applying to it.

The exaggeration animation Task

Now I have to pick one of the drawings made in the exaggeration exercise and refine it into a simple design suitable as an animation production drawing.
One rule I learnt in animation is that the simplier the lines are the easier it will to animate and you have less chance to make mistakes.


Since the drawing I chose had to much shading in it, I have decided to get rid of the shading and animate a plain character.

Exaggeration Project Part 3

Here are more exaggerated expressions:
Surprised or shocked expression, here is how I would draw it:
Bigger eyeballs than usual, higher eyebrows and an open mouth for more effects.


And here are some other squashed faces that you can compare to th eoriginal drawing just to see what was exaggerated.

Exaggeration project-Part 2

Here are some other simple exaggerated faces.
I did another one for the skeptical expression, this time around you can see the character's entire body and it seems smaller than the face (Another form of perspective view).

One for a sad expression, the eyes look big and watery (glassy effect I would say like He is about to cry) or maybe like a puppy face.
Another version of a sad exaggerated expression, this time the character's mouth corners are pointing  down on either side of his mouth. (This  gives a stronger sense of sadness) when combined with the glassy look I Think)-This is more suitable for a sad expression than for a puppy face one.


I tried to draw a really exaggerated hppy face, as you can see th enoose is wider, the face is squashed rather than stretched and the character's has got a wider mouth.

Exaggeration Project

Visually exagerate portraiture of either yourself or friends...Will need to do a quick series of sketches first
(I will need to make sketches of How my friends or I look in real life first) then exaggerate the faces--- I will try to stretch their faces first just to see how it would look.
I have decided to choose Richard and exaggerate his face.

Here are some sketches.

There is the orignal face of the person, then how it would look if he was angry or skeptical.
If he is angry, I cannot really stretch his face so I just make his eyebrows look bushier and thicker to emphasize his frown, if he is skeptical it's good to give him a perspective view, raise an eyebrow and make the other eye look like it's slightly closed. (The idea of Thick pointed looking eyebrows was based on how Wolverine hairstyle looked)